As an Amazon Associate, we earn from qualifying purchases. Some links on this site are affiliate links at no extra cost to you. Our recommendations are based on thorough research and editorial judgment.
The Ultimate Transmitter Setup Guide For 3D Flying
The ultimate transmitter setup for 3D flying begins with selecting ergonomic hardware featuring high-resolution hall-effect gimbals and multiple programmable switches for better control. After connecting the receiver and configuring protocols like SBUS, it’s essential to adjust control settings, including endpoint calibration and dual rates. Implementing fail-safe protocols and optimizing antenna placement enhances performance and safety. By mastering these components, pilots can enjoy a smooth, responsive flying experience. Discover additional tips for a superior setup.
Key Takeaways
- Select transmitters with high-resolution hall-effect gimbals for precise control and long-lasting performance during 3D flying sessions.
- Adjust endpoint calibration and set dual rates at 100% to maximize control surface travel without binding.
- Utilize exponential adjustments for smoother stick response, particularly around neutral positions during intricate maneuvers.
- Configure flight modes on the transmitter to accommodate various 3D styles and adjust servo endpoints effectively.
- Regularly test and calibrate your transmitter to ensure optimal performance and responsiveness in 3D flying conditions.
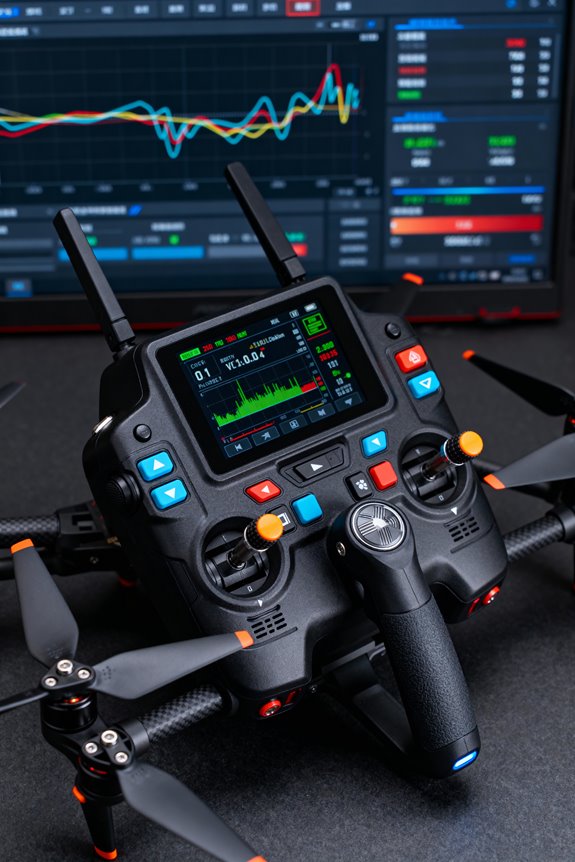
Transmitter Hardware Setup for 3D Flying
You may be interested


When preparing for 3D flying, selecting the right transmitter hardware is essential for achieving precise control during complex maneuvers.
Transmitter Ergonomics****
Choose a transmitter designed with robust ergonomics in mind, ensuring comfort during long sessions. This reduces fatigue, allowing pilots to focus on their flight.
Gimbal Precision
Opt for high-resolution hall-effect gimbals that promote unparalleled stick precision and durability. These gimbals enhance responsiveness, vital for performing intricate 3D tricks.
Programmable Features
Look for transmitters with multiple programmable switches, sliders, and customizable control layouts. This versatility allows pilots to tailor their controls to individual preferences, elevating their flying experience. Incorporating features like multiple programmable switches can significantly enhance the functionality of your setup.
Investing in quality hardware not only improves performance but fosters an inclusive community spirit among fellow enthusiasts. Starting the 3D flying journey becomes even more exhilarating with the right setup.
Recommended Products

【Radiomaster TX15 Max ELRS Transmitter】Features the Semtech LR1121 chip supporting 2.4GHz and 900MHz bands. Equipped with an STM32H7 processor and pre-installed EdgeTX firmware to handle complex Lua scripts. Designed for FPV drones, fixed-wing aircraft, and RC helicopters requiring high-speed data processing
【ELRS Compatibility】Radiomaster TX15 Max ELRS Transmitter features the Semtech LR1121 chip supporting 2.4GHz and 900MHz bands. This means you can fly FPV drones at long distances with a stable and reliable signal, whether you are flying close by or pushing the limits of range. It is suitable for FPV drones, RC multirotors, RC helicopters, fixed-wing models, RC cars, RC boats and RC robots

Flight Controller and Receiver Configuration

Configuring the flight controller and receiver is a pivotal step in optimizing a 3D flying setup. To begin, it’s crucial to understand receiver wiring; connect the RX on the receiver to the TX on the flight controller, and vice versa. Use UART configuration through the Ports tab to enable Serial RX on the appropriate UART port, avoiding conflicts with the MSP switch.
Selecting the correct receiver protocols, like SBUS or CRSF, is fundamental for effective communication. The binding process will pair the transmitter with the receiver, ensuring smooth operation. After binding, verify with the Betaflight Receiver tab that controls function correctly. Consistent configuration allows enthusiasts to enjoy reliable and responsive 3D flight experiences, enhancing their connection to the flying community. Additionally, for devices like TENS units, understanding the importance of battery type can significantly affect performance and convenience in various applications.
Transmitter and Receiver Custom Builds and Integration

In the domain of custom transmitter and receiver builds, enthusiasts have endless possibilities to tailor their systems for 3D flying. Receiver selection is essential; it must match the specific transmitter brand and model for reliable control. Binding involves simple steps but varies by manufacturer, requiring careful adherence to bind protocols.
Custom hardware builds bridge creativity and functionality, often utilizing microcontrollers like Arduino Nano alongside RF transceiver modules. This integration allows the addition of custom firmware, which can enhance safety features like gradual throttle reduction during signal loss. Proper mounting of receivers prevents vibration interference, ensuring ideal signal integrity. By experimenting with these customizations, pilots can create a unique flying experience that resonates with the community’s spirit of innovation. Additionally, incorporating ergonomic designs can significantly enhance user comfort during extended flying sessions.
Recommended Products
![Arduino Nano Every (6 Boards Pack) [ABX00028-6P] - Compact & Powerful Microcontroller for Scalable Prototyping & IoT](https://m.media-amazon.com/images/I/41i6fog3wZL._SL500_.jpg)
ATmega4809 Microcontroller: The Arduino Nano Every is powered by the ATmega4809 microcontroller, running at 20 MHz, offering improved performance and memory compared to previous Nano models, making it ideal for a wide range of embedded and DIY projects.
![Arduino Giga R1 WiFi [ABX00063] - High-Performance Microcontroller with Dual-Core ARM Cortex-M7 & M4, Wi-Fi, Bluetooth, and Advanced I/O for IoT & Edge Computing](https://m.media-amazon.com/images/I/51huzdomj0L._SL500_.jpg)
Dual-Core Power for High-Performance Projects: The Arduino Giga R1 WiFi is equipped with a dual-core ARM Cortex-M7 (480 MHz) and ARM Cortex-M4 (240 MHz) microcontroller, providing impressive processing power for complex applications like edge computing, real-time data analysis, and AI tasks. This high-performance architecture is perfect for demanding projects in robotics, automation, and IoT.

Featuring F-1000Hz refresh rates and a high-efficiency cooling system, the Ranger Nano 2.4GHz ELRS Module represents the cutting edge in ELRS technology. Attach the module to a compatible radio (RadioMaster and more) to enjoy all that ELRS has to offer.
Software Setup and Configuration Tools

The integration of software tools plays a significant role in achieving ideal setup and configuration for 3D flying transmitters and receivers. Utilizing dedicated configurator software, such as Betaflight Configurator or OpenPilot, guarantees software compatibility with the latest firmware.
Firmware Installation and Updates
– Flash firmware via USB in bootloader mode for essential bug fixes.
Flight Controller Configuration
– Set receiver signal types and calibrate controls through user-friendly configuration interfaces for accurate performance.
Transmitter to Simulator Setup****
– Use flight simulator software like PhoenixRC for practicing 3D maneuvers safely.
Advanced Configuration Tools
– Take advantage of calibration utilities and community scripts to enhance control and flight data visualization. Additionally, ensuring safety features in your transmitter setup can prevent unexpected mishaps during flights.
These essential tools foster a connected community, guiding users toward achieving peak flying experiences.
Antenna and Signal Optimization

Understanding antenna and signal optimization is fundamental for enhancing the performance of 3D flying drones. The choice of antenna types impacts overall functionality.
- Omnidirectional antennas excel in short-range applications, offering 360° coverage, while directional antennas provide higher gain for long-range flights but need careful alignment.
- GPS/GNSS antennas require a clear sky view to resist signal interference and multipath issues.
Optimal placement is imperative; vertical orientation on drone arms enhances link quality. Techniques such as using diversity receiver setups can mitigate signal loss and enhance reliability. Additionally, ensuring that your antennas are designed with adjustable heat settings can help in maintaining optimal performance under varying weather conditions.
Lastly, ensuring antennas are free from disturbances, like motors and metal obstructions, is essential. These strategies collectively enhance communication, making your 3D flying experience smooth and enjoyable.
Recommended Products

【2cm Accuracy Laser Measurement (Up to 30m)】The SMA28H laser RTK is equipped with a visible green laser, allowing for non-contact point measurements within a 30m range. But the laser accuracy is 3-4cm within a range of 15m. Simply aim and mark – ideal for measuring points that are difficult to reach but visible to the naked eye

𝗖𝗮𝗽𝘁𝘂𝗿𝗲 𝗕𝗿𝗲𝗮𝘁𝗵𝘁𝗮𝗸𝗶𝗻𝗴, 𝗜𝗺𝗺𝗲𝗿𝘀𝗶𝘃𝗲 𝗦𝗵𝗼𝘁𝘀 - DJI Air 3's dual cameras offer creative focal-length options ideal for travel photography. Show off stunning environments and tell captivating stories through your lens.

Immersive 1080P Ultra-Wide FPV Experience: Dual 1920×1080 HD displays deliver sharp details, vivid colors, and smooth visuals. The 50° field of view creates an immersive cockpit-like perspective, bringing more excitement to FPV racing, freestyle, and cinematic flights.
FPV System Setup Including Head Tracking and Control Channels
Setting up an FPV system, especially for 3D flying, requires careful integration of various components to guarantee peak performance.
Recommended Products

Ultra-HD FPV Experience with 1080P FPV Goggles & 4K Recording: dual 1920×1080 HD displays with 50° FOV on the FPV Goggles X deliver vivid colors and immersive visuals, while the Moonlight Kit supports 4K/2.7K/1080P video recording at up to 150Mbps bitrate—perfect for freestyle, cinematic, and racing flights.

Immersive Flight, Broaden Your Horizons - Pair it with DJI RC Motion 3 to get a fully immersive motion control experience, or use it with the RC-N2 or RC 2 remote controllers to pilot a 3-axis-gimbal camera drone. All this delivers silky-smooth live feeds so you can fully enjoy the FPV flying experience.

Component Integration
- FPV Camera: Power requirements vary; some need 12V, while others use step-down BEC converters. Proper connection is essential for operation.
- Head Tracking: By integrating head tracking, the pilot achieves enhanced camera control. This connection between headset sensors and the drone’s gimbal allows synchronous movement with head orientation.
Control Channels
– Transmitter Channels: An arm/disarm switch is crucial. Additional channels are required for toggling 3D mode and integrating pan/tilt servos for head tracking.
Ensuring these configurations aligns improves the overall flying experience, making every flight feel connected and precise. Engaging technology in this manner fosters a greater sense of camaraderie within the flying community. Additionally, utilizing red light therapy devices can enhance recovery and overall wellness, making them a valuable tool for pilots after extensive flying sessions.
Soldering Techniques for Vtx Connections
Soldering VTX connections requires precision and careful technique to guarantee reliable performance in FPV systems.
Choosing the Right Tools
Select a soldering iron with adjustable temperature for peak control. Quality solder and flux application are essential to create strong solder joints, preventing cold joints and oxidation.
Preparation
Pre-tin the wire ends and VTX pads to facilitate easy connections. Ascertain wires are neat and organized, minimizing stress on joints.
Effective Techniques
Hold wires firmly against pads using tweezers, heating them simultaneously before applying solder. Use just enough solder to cover joints without forming bridges. Allow joints to cool without movement for the best results.
Mastering these techniques fosters confidence and belonging within the FPV community, enhancing every flight experience.
Fail-Safe Protocols for Safe Landings
Safety is paramount in the world of FPV flying, particularly when it comes to fail-safe protocols for safe landings. Implementing a two-stage failsafe system guarantees robustness against signal loss.
Key Features:
- Signal Recovery: The first stage activates upon signal loss, holding the last controls or auto-centering.
- Emergency Maneuvers: If the signal remains lost, the second stage executes predefined actions: Drop, Land, or GPS Rescue.
Drones with battery monitoring alert the pilot to low power levels, triggering a return-to-home function.
Geo-Fencing: This feature uses GPS to prevent flying out of designated areas, enforcing landing protocols when boundaries are exceeded.
Regular failsafe testing confirms that these systems function correctly, reducing risks and enhancing safety for all pilots in the community.
Testing and Troubleshooting Setup
Testing a transmitter and receiver setup is essential for guaranteeing a smooth and successful FPV flying experience. To begin, check that the drone is in binding mode, with a visible LED indicator. Use compatible settings to bind your transmitter, saving configurations, and rebooting the flight controller afterward.
Wiring and Checking Connections
Inspect all wiring for damage and guarantee correct connections between receiver and flight controller. Use a multimeter to verify continuity.
Software Configuration
Enable the Serial RX option in your flight controller’s settings. Guarantee the receiver protocol is correctly matched.
Troubleshooting Techniques for Signal Loss****
If issues persist, isolate hardware faults by testing components separately. Rebind if communication is lost, and always analyze stick inputs for accuracy.
Adjusting Control Settings for 3D Maneuvers
Adjusting control settings for 3D maneuvers is essential for achieving the precise responsiveness needed in advanced flying techniques.
Recommended Products

EASY TO FLY RC AIRPLANE: Equipped with exclusive SAFE technology that helps prevent crashes and makes it easy to learn how to fly.
SUITABLE FOR BEGINNERS AND EXPERTS: equipped with Xpilot gyro stabilizer system, with 3 level flight control assist (Beginner level with full assist/ Intermediate with partial assist/ Expert for manual control) , this rc planes is ideal for pilots of all levels. Beginners can gradually gain confidence, while experts can show off their skills right out of the gate

SUITABLE FOR BEGINNERS AND EXPERTS: equipped with Xpilot gyro stabilizer system, with 3 level flight control assist (Beginner level with full assist/ Intermediate with partial assist/ Expert for manual control) , this rc planes is ideal for pilots of all levels. Beginners can gradually gain confidence, while experts can show off their skills right out of the gate
Endpoint Calibration
Each control surface must be adjusted to its physical limits, guaranteeing maximum travel without binding. This assures full stick movement corresponds to control surface responsiveness.
Dual Rate Adjustments
Typically set at 100%, dual rates govern maximum travel while endpoint settings define limits.
Expo Sensitivity
Exponential (Expo) adjustments soften response around neutral positions, enhancing precision during sensitive maneuvers.
Flight Profile Diversity
Transmitter flight modes allow quick adaptations for various 3D styles, managing servo endpoints, dual rates, and expo.
Gyro Tuning
Setting gyros post-endpoint calibration ensures stability during elaborate movements, maintaining peak flight characteristics.
Fine-tuning these settings creates a reliable platform for mastering 3D flying.
Best Practices for Antenna Placement and Integrity
Successful 3D flying relies not only on control settings but also on effective antenna placement and integrity, which are fundamental to maintaining reliable connection and signal quality.
Antenna Orientation and Diversity
- Antennas should be mounted perpendicularly to guarantee signal reliability.
- Use a combination of directional and omni-directional antennas to avoid polarization mismatch.
Mounting Materials and Protection
- Avoid carbon fiber contact, as it blocks signals.
- Secure antennas using 3D printed TPU mounts to minimize antenna vibration and enhance durability.
Orientation Strategies
- Position antennas for ideal line-of-sight during aggressive flight maneuvers.
- Mount them on opposite arms to improve spatial diversity and counteract interference from different angles.
Following these guidelines fosters a strong connection, enhancing the overall 3D flying experience.
Frequently Asked Questions
What Is the Best Type of Transmitter for Beginners?
The best type of transmitter for beginners combines essential features like compatibility, lightweight design, and ease of use. Models such as the Radiomaster TX16S and Flysky FS-i6x excel in providing an accessible pathway for novice pilots.
How Can I Improve Battery Life While Flying?
To improve battery life during flights, users should prioritize battery calibration and energy management. Maintaining ideal charge levels, avoiding excessive depletion, and flying under suitable conditions can greatly enhance overall battery longevity and performance.
Are There Regulations for Flying Drones in My Area?
Local drone regulations often impose flying area restrictions, including no-fly zones near airports and populated areas. Pilots should check specific rules to guarantee compliance and promote safe flying, fostering a responsible drone community.
How Do I Choose the Right Flight Modes for 3D Flying?
Choosing the right flight modes for 3D flying unfolds like a pilot’s canvas; beginners embrace self-leveling for stability, while seasoned flyers toggle stunt modes for adrenaline-fueled inverted flight, each choice a brushstroke in aerial artistry.
What Tools Do I Need for Building a Custom Transmitter?
To build a custom transmitter, one requires soldering techniques for component connections, careful antenna placement for maximum signal, along with various electronic components, tools for assembly, and programming environments to guarantee effective operation and functionality.


