As an Amazon Associate, we earn from qualifying purchases. Some links on this site are affiliate links at no extra cost to you. Our recommendations are based on thorough research and editorial judgment.
How To Repair A Composite Glider Wing
To repair a composite glider wing, start with a systematic damage assessment, documenting type, size, and location of damage. Clean the surfaces with mild soap and water for best adhesion. Utilize repair techniques like foam core replacement and scarf joints to maintain strength. Apply prepreg carbon fiber, guaranteeing controlled resin content, and cure in a vacuum bag at precise temperatures for enhanced performance. Proper maintenance, such as regular inspections, will assure longevity, and further insights await you.
Key Takeaways
- Systematically assess the damage by documenting type, size, and location before planning repairs using advanced inspection techniques.
- Thoroughly clean the surface with mild soap and water, and ensure it is completely dry for optimal adhesion of repair materials.
- Use compatible materials and techniques like foam core replacement and scarf joints to maintain wing strength during repairs.
- Apply controlled curing processes with vacuum bagging and appropriate temperature profiles to enhance material consolidation and performance.
- Regularly inspect, clean, and protect the glider with proper storage and maintenance practices to prevent future damage.
Damage Assessment and Initial Preparation
You may be interested


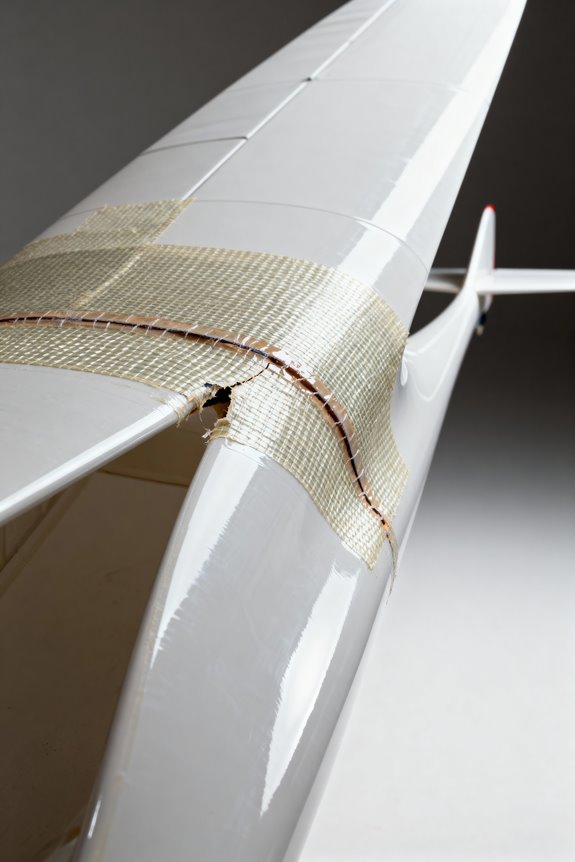
When evaluating damage to a composite glider wing, it is essential to approach the process systematically. The first step is thorough damage assessment, which includes documenting the type, size, and location of damage. Key assessments involve identifying delamination in the carbon fiber skin, disbonding between the skin and core, or cracks within the core.
Utilizing advanced inspection techniques enhances accuracy. For instance:
- Ultrasonic testing detects bond deficiencies effectively.
- Visual inspections paired with tapping can uncover hidden issues.
Following assessment, compile clear damage documentation to inform the repair strategy. This will guide the repair scope—ensuring targeted interventions that restore the wing’s strength. Ultimately, a methodical approach fosters reliability, enhancing safety and longevity for all glider enthusiasts. Additionally, considering the use of large electric heating pads can provide comfort to those engaged in lengthy repair processes.
Recommended Products

COMPLETE CARBON FIBER REPAIR KIT WITH EPOXY RESIN & HARDENER – Professional-grade carbon fiber fabric repair kit includes 36"x12" 3K 2x2 twill carbon fiber cloth, 8 fl oz epoxy resin & 8 fl oz hardener. Perfect carbon fiber starter kit for beginners & pros. Automotive, marine, boat, auto & DIY composite repairs. High-performance structural reinforcement.
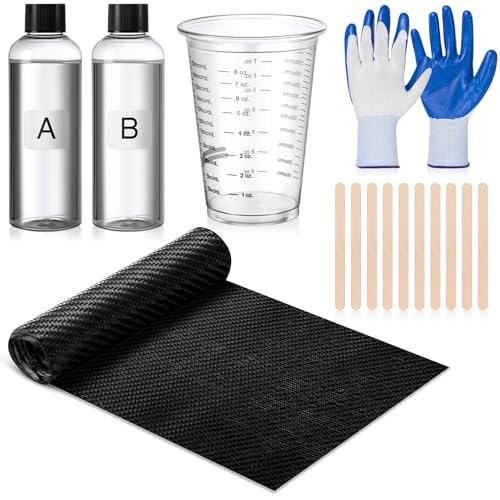
Carbon Fiber Repair Kit: our carbon fiber epoxy resin kit includes 1 pc 3K 200g twill carbon fiber cloth (39.37 x 5.91 inches/ 100 x 15 cm), 1 bottles of 100g epoxy resin, 1 bottle of 100g hardener, 1 pc 8 oz measuring cup, 10 pcs stirring sticks, and a pair of coated gloves; Everything you need to perform a reliable repair job is available in one package

Complete Ready-to-Use Set: Carbon fiber repair kit includes 5FT x 12" 220g/m² carbon fiber cloth, 200g resin, 100g hardener, two 50ml measuring cups, two mixing sticks, one pair of disposable gloves, one No.5 brush and one piece of sandpaper for professional-grade and seamless repair experience.
Cleaning and Surface Preparation

Cleaning and surface preparation are essential steps in the repair of composite glider wings, as they guarantee ideal adhesion and integrity of subsequent repair materials.
Cleaning Techniques
Use clean water for rinsing to prevent chemical damage. When necessary, apply mild soap for salt or sand removal, avoiding harsh chemicals that degrade materials.
Surface Protection
Limit UV exposure and store gliders under covers or trailers. Regularly maintain the gel-coat with non-silicone wax polish every six months.
Surface Preparation
Ensure surfaces dry completely to avoid moisture-related issues. Wet sanding with progressively finer grit produces a smooth finish. Finally, hand buffing revitalizes the surface, facilitating optimal bonding or coating for repairs. Additionally, incorporating proper heat therapy techniques can also aid in alleviating tension in muscles, which might be beneficial for glider enthusiasts after long hours of use.
Adhering to these methods enhances longevity and performance, fostering a sense of community among diligent glider enthusiasts.
Repair Techniques and Material Application

Repairing a composite glider wing requires meticulous attention to detail in order to restore its structural integrity and performance. Key repair methods include:
- Foam Core Replacement: Completely remove damaged foam and replace it with a precisely cut piece, guaranteeing snug fitting and proper alignment.
- Crack Stabilization: Apply cyanoacrylate glue to stabilize cracks, complemented by sanding to prepare the surface for new material, enhancing material adhesion.
- Composite Material Application: Select compatible carbon fiber or fiberglass, wet out with high-quality epoxy resin, and apply in overlapping layers to avoid delamination.
- Scarf Joint Techniques: Use tapered cuts to create strong connections between old and new material, preserving original wing strength.
Additionally, using soft fabrics like flannel or micromink for any protective covering during repairs can enhance the overall durability and comfort of the wing’s surface.
These methods guarantee effective repairs, enabling enthusiasts to confidently keep their gliders in superior flying condition.
Recommended Products

PROFESSIONAL GRADE MARINE RESIN Engineered for large scale fiberglass repair, marine fabrication, composite construction, and structural laminating applications requiring dependable professional performance.

EPOXY KITS include low-viscosity resin and clear, non-blushing hardener for woodworking, boat building, laminating and repair projects. Ideal for clear coating. Simple mix ratio of 2 parts resin to 1 part hardener

✅ 100% REAL CARBON FIBER SHEET - Made of pure carbon fiber material, without any fillers/composite layers, ARRIS carbon fibre sheet features super stiff, sturdy, lightweight, and sustained, will not tear or rip easily, and easy to cut with a saw or water jet without crumbs being created, and do some amazing DIY jobs easily.
Lamination and Curing Process
In the process of crafting a durable and high-performance composite glider wing, understanding the lamination and curing procedures is essential.
Recommended Products

Knife Cutting attachment for CNC Routers
Knife Cutting attachment for CNC Routers
Knife Cutting attachment for CNC Routers
Lamination Techniques
Utilizing prepreg carbon fiber allows for controlled resin content, ensuring superior strength and stiffness. Carefully arranged fiber orientations enhance performance characteristics tailored to specific load paths.
Curing Methods
The curing process involves staged temperature profiles in controlled ovens, reaching 80-120 °C. This prevents thermal shock and promotes even resin distribution through vacuum bagging techniques.
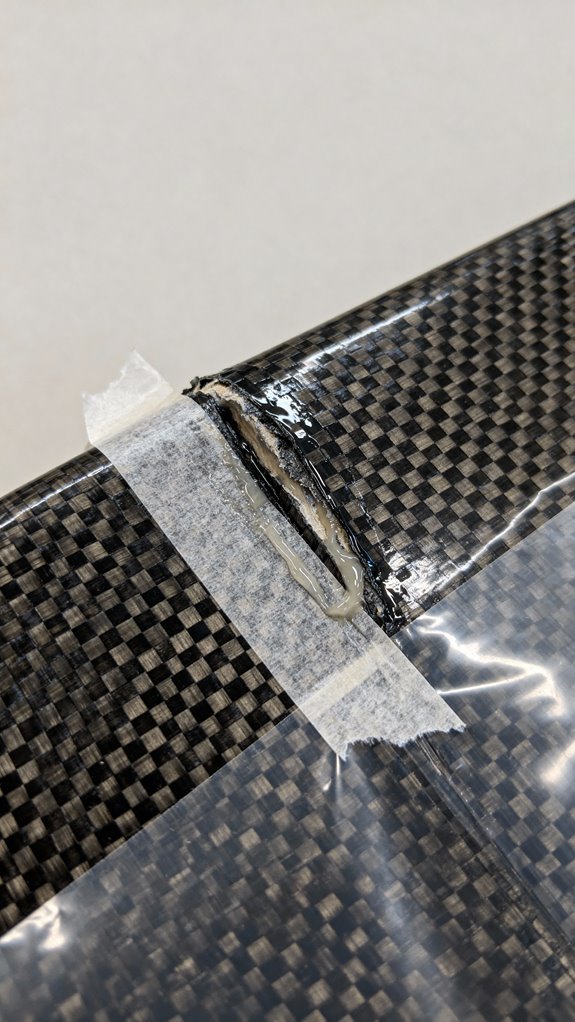
Applying gradual vacuum pressure during lamination consolidates plies, expelling air to enhance mechanical performance. Popular materials like Mylar film and breather cloth safeguard the surface while facilitating resin bleed.
The importance of controlled resin content in achieving optimal performance cannot be overstated.
Mastering these lamination techniques and curing methods leads to a robust and reliable glider wing that embodies the spirit of excellence.
Finishing and Surface Restoration

Finishing and surface restoration of a composite glider wing is a crucial stage that guarantees both aesthetics and functionality. First, it is important to prepare the surface, removing all dust and impurities. This allows for proper adhesion of surface coatings.
Finishing Techniques:
- Sanding: Smooths the edges of patched areas to blend seamlessly with the wing.
- Filling: Low spots should be filled with suitable materials for even surfaces.
Surface Coatings:
- Primer: Seals the repaired area and creates a uniform base for final paint layers.
- Topcoat: A matching paint restores the original appearance and protects against UV damage. Incorporating proper safety features ensures that the restoration process does not compromise the structural integrity of the glider.
These steps guarantee a polished finish, enhancing the glider’s performance and visual appeal, fostering pride among its owners and pilots.
Structural Testing and Quality Assurance
How can the integrity of a composite glider wing be assured through rigorous structural testing and quality assurance? Securing structural integrity involves several key steps:
- Mechanical Property Testing: Static three-point bending tests identify vital attributes, including bending strength and modulus. Specialized testing machines, like WDW-150S, along with ASTM C393 standards, guarantee reliable results.
- Non-Destructive Testing (NDT): Techniques such as ultrasonic testing are fundamental for detecting anomalies, assuring that the wing’s bond integrity remains intact throughout production.
- Validation of Finite Element Models (FEM): Conducting structural wing tests to align predicted deflections with actual behavior supports the validation process, bolstering confidence in design safety margins. Additionally, the use of non-invasive treatments such as red light therapy can aid in repairing minor damages to composite materials by promoting healing and recovery.
Tools and Materials Needed
Repairing a composite glider wing requires a selection of specialized tools and materials that cater to the unique demands of composite work.
Essential Repair Kits:
- Composite Material Repair Tool Kit: Includes pneumatic tools for installation and aerospace-grade fasteners up to 1/4”.
- CN Glider Repair Kit: Features spread tow carbon mat and fiberglass tailored for wings and fins.
Composite Materials:
- Carbon Fiber Mats and Rovings: Provide structural strength and flexibility for internal support.
- Foam Core Materials: Serve as inner fill in sandwich constructions.
Adhesives and Epoxy Systems:
– Five-Minute Epoxy: Guarantees durable bonding with proper application.
Appropriate tool selection and material compatibility are critical in achieving durable, effective repairs that promote successful glider performance.
Common Mistakes to Avoid
When undertaking a composite glider wing repair, awareness of common mistakes can greatly enhance the outcome.
Incorrect Damage Assessment
Utilizing improper damage evaluation techniques can lead to overlooking hidden issues, such as internal damage or incompatible materials. Properly identifying the composite type and core condition is essential.
Poor Surface Preparation
Inadequate paint removal and cleaning weaken adhesive bonds. Not preparing surfaces correctly can result in compromised repairs.
Misapplication of Repair Materials
Choosing the wrong resins or hardeners can diminish repair strength. Insufficiently impregnating fibers also leads to weak spots.
Final Inspection
Skipping thorough inspections or necessary post-repair testing can compromise safety. Taking the time to assess repairs guarantees lasting performance and reliability.
Tips for Maintaining Composite Wings
Maintaining composite wings is essential for guaranteeing ideal performance and longevity, especially as environmental factors can greatly impact their integrity.
UV Protection
Use wing covers and trailers to shield wings from harmful UV light, preventing resin deterioration.
Moisture Prevention
Store gliders in hangars to minimize moisture exposure. Never leave water ballast inside the wings overnight.
Maintenance Routine
Establish a regular cleaning schedule, using water and a mild detergent to protect surfaces. Clean every six months.
Cleaning Frequency and Polish Application
After cleaning, dry wings immediately and apply a non-silicone wax polish for added protection.
Surface Inspection and Bonding Techniques****
Conduct thorough inspections for damage. Use proper bonding techniques to guarantee repairs maintain structural integrity, fostering a dependable and safe flying experience.
Resources for Further Learning
How can one deepen their understanding of composite wing repairs? Engaging in repair webinars and DIY workshops offers a pathway to enhanced knowledge.
Repair Webinars
These online sessions often provide live demonstrations of repair techniques like foam core splicing, spar repairs, and resin layering. Participants can interact, ask questions, and gain insights from experienced professionals.
DIY Workshops
Hands-on workshops allow individuals to practice under expert guidance. Learning to stabilize cracked wing tips or properly prepare surfaces builds confidence and skill.
Video Tutorials
Furthermore, platforms like Radio Carbon Art’s “Glider Repair 3 Lab” present extensive visual guidance on various repair methods. Such resources foster community learning, ensuring that both beginners and seasoned enthusiasts can effectively tackle composite wing repairs.
Frequently Asked Questions
How Long Does a Typical Wing Repair Take?
Repairing a wing is like stitching a tear in a fabric of dreams. Typically, the repair process can take from a few hours to several weeks, depending on chosen repair techniques and the extent of damage.
What Types of Epoxy Are Best for Composite Repairs?
For composite repairs, aerospace-grade epoxy types like WEST SYSTEM 105, HYSOL, and two-part systems are highly effective, utilizing advanced repair techniques that guarantee strong bonding, environmental resistance, and structural integrity, fostering confidence within the repair community.
Can You Repair a Wing Without Professional Help?
Yes, DIY repairs may be feasible for minor damage, but wing safety should be prioritized. Skill levels and environmental conditions greatly impact success, making careful consideration essential before undertaking such repairs without professional assistance.
What Are the Costs Associated With Wing Repairs?
Costs associated with wing repairs can soar like a glider, with repair materials and labor often exceeding thousands. Cost estimates reveal that extensive damage may lead to bills surpassing $4,200, including refinishing and parts.
How Can I Prevent Future Damage to My Glider Wing?
To prevent future damage to a glider wing, the individual should prioritize preventative maintenance and conduct regular inspections. Vigilant monitoring will foster community standards, ensuring safety and longevity among fellow enthusiasts who cherish their gliding experiences.